


Table of contents
- What is NestJS, Redis and ioredis
- Real-life motivation to build this module...
- Step 1: Scaffold a NestJS project with nest-cli
- Step 2: Build the Redis module
- Step 3: Configure the RedisModule in our AppModule
- (Bonus) Part 4: Docker to start Redis & Redis-insight services
- Part 5: Connect to the Redis server from the Nest application and set a key-value
- Conclusion
This RedisModule serves as a starting point and can be expanded or modified based on the specific requirements and functionality you want for your project. This article looks at how to provide an ioredis client through our RedisModule to various other modules in our NestJS application by dependency injection.
What is NestJS, Redis and ioredis
NestJS
Nestjs is a powerful, modular, and extensible TypeScript framework for building scalable server-side applications. It combines elements of Object-Oriented Programming (OOP), Functional Programming (FP), and Reactive Programming to provide a solid foundation for application development.
Built-in dependency injection (DI) simplifies the management of dependencies and enhances testability.
Keeping this DI in mind we are going to inject Redis functionality where we require it in our services.
Redis
Redis is an open-source, in-memory data structure store used in modern web development, providing fast read and write operations.
It supports versatile data structures such as key-value pairs, strings, lists, sets, and sorted sets, allowing flexible data modelling.
ioredis
ioredis is a high-performance Redis client library for Node.js, providing optimized communication with Redis servers.
It supports the full range of Redis features and provides a simple API for seamless integration in applications.
ioredis handles failover and ensures high availability by supporting Redis replication and clustering.
Integration with Redis Sentinel enables automatic failover and master-slave replication management.
Flexible configuration options and support for advanced Redis features offer customization and control to developers.
These points are just key facts to remember for this exercise. Both NestJS and Redis have a large feature set and many more interesting things they are capable of providing.
We are going to expose this ioredis client to our services in the NestJS project to interact with the Redis servers for key-value store functionality.
Real-life motivation to build this module...
At work, I needed a way to store key-value with expiry for our OTP verification.
We onboard the user, i.e. save to our database after the verification and don't persist the user anywhere before this step is complete. So we decided to use Redis to store the phone/email along with the OTP secret for this user.
Then at verification, fetch this secret from Redis and validate it with the OTP sent by the user to the servers.
This isn't something new, but it is a first for me. Also, setting up in NestJS would require a different approach as compared to say expressJS, so I looked into it and this is what I found.
Step 1: Scaffold a NestJS project with nest-cli
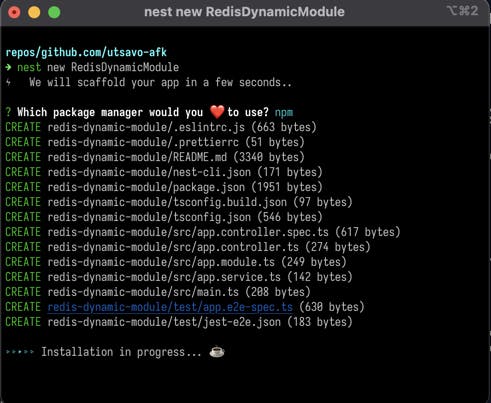
Create nest project
nest new <name_of_project>.Select package manager at the prompt (I used npm).
\The project Name must be in kebab-case or cli will take care of this for you.*
Let's open the project in the code editor of choice (I use vscode).
Step 2: Build the Redis module
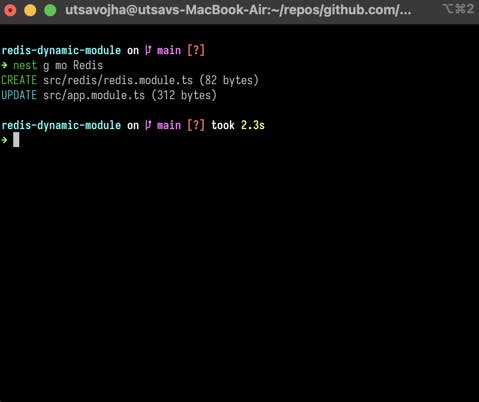
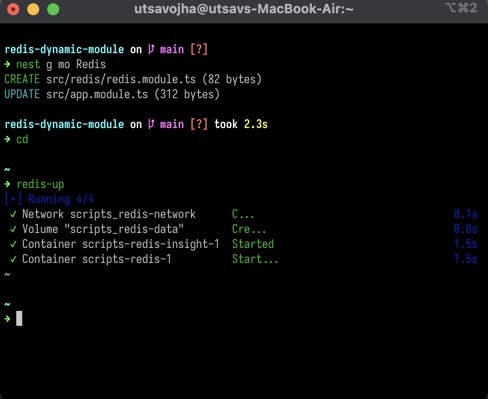
Run
nest g mo Redisto scaffold a module through cli.We should have a Redis folder with a
redis.module.tsfile.Run
npm i ioredisinstall the Redis client for nodejs to interact with the Redis server.Let's create this to be a dynamic module.
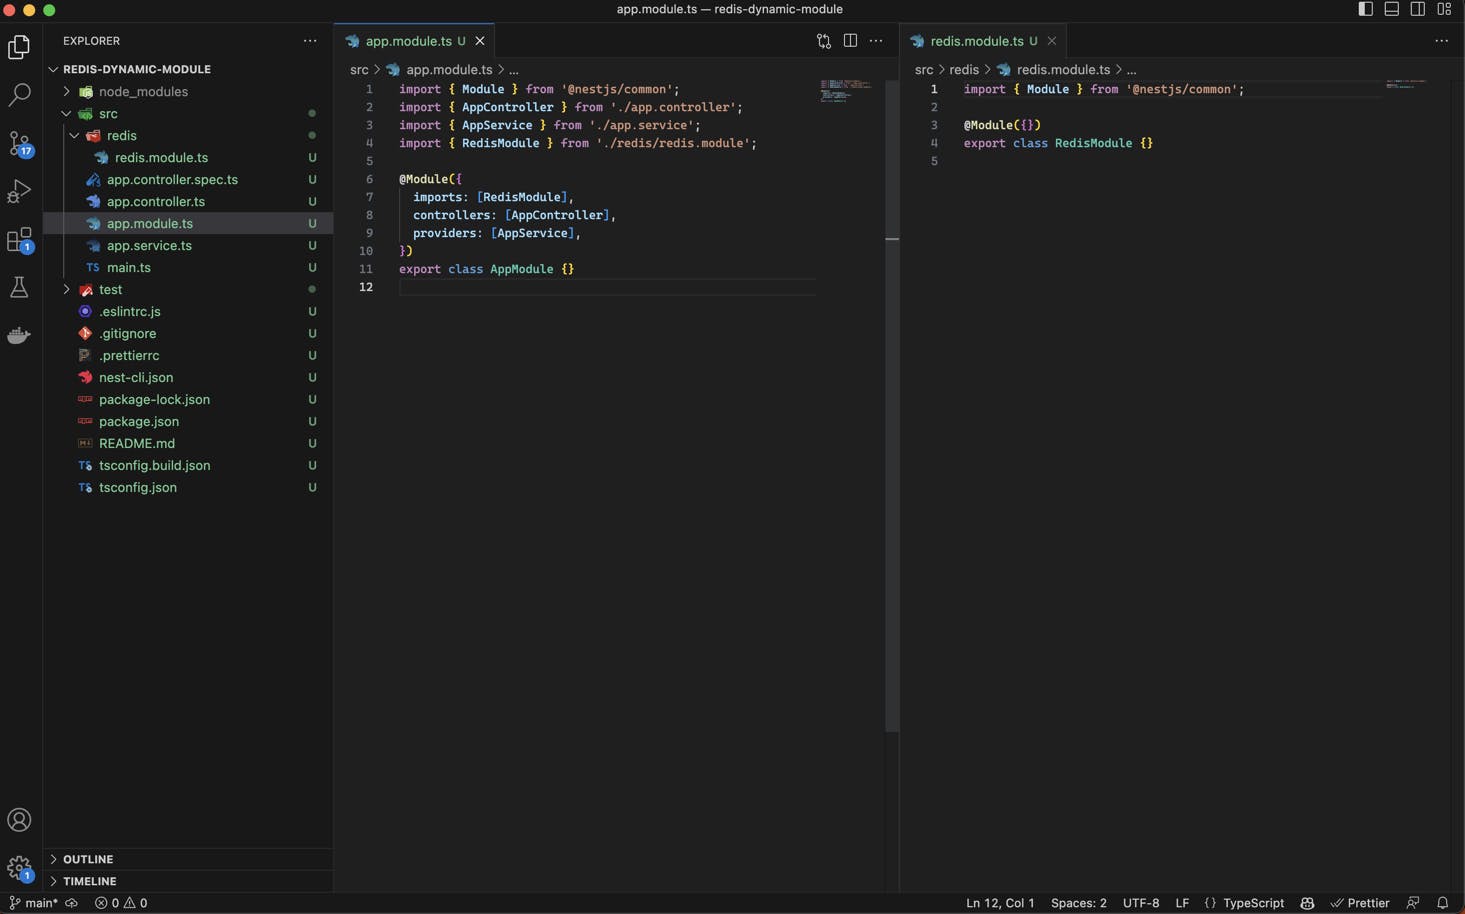
We have a
app.module.tsand within this we are importing theRedisModule, we need to configure our RedisModule and come back to the import in AppModule.Move to
redis.module.ts, we will configure this to be a dynamic module which we can import into different modules and use ConfigModule, and ConfigService provided by NestJS to inject different configurations to instantiate this module on a per-module basis (the module where we import this RedisModule).
import { DynamicModule, Module } from '@nestjs/common';
import IORedis, { Redis, RedisOptions } from 'ioredis';

export const IORedisKey = 'IORedis';

type RedisModuleOptions = {
  connectionOptions: RedisOptions;
  onClientReady?: (client: Redis) => void;
};

type RedisModuleAsyncOptions = {
  useFactory: (
    ...args: any[]
  ) => Promise<RedisModuleOptions> | RedisModuleOptions;
  inject?: any[];
  imports?: any[];
};

@Module({})
export class RedisModule {
  static async registerAsync({
    useFactory,
    inject,
    imports,
  }: RedisModuleAsyncOptions): Promise<DynamicModule> {
    const redisProvider = {
      provide: IORedisKey,
      useFactory: async (...args: any[]) => {
        const { connectionOptions, onClientReady } = await useFactory(...args);
        const client = new IORedis(connectionOptions);
        if (onClientReady) {
          onClientReady(client);
        }
        return client;
      },
      inject,
    };
    return {
      module: RedisModule,
      imports,
      providers: [redisProvider],
      exports: [redisProvider],
    };
  }
}
What is a dynamic module in NestJS
Dynamic modules in Nestjs enable runtime configuration and registration, enhancing flexibility and extensibility.
They allow for the dynamic composition of application features based on runtime conditions or external configurations.
Advantages include modular architecture, flexible configuration, dynamic feature activation, plugin system support, and seamless integration with dependency injection.
Dynamic modules empower Nestjs applications with adaptability, scalability, and enhanced development experience.
Back to the code...
Now back to the redis.module.ts file, let's explore the code
import { DynamicModule, Module } from '@nestjs/common';
import IORedis, { Redis, RedisOptions } from 'ioredis';
Imports we require to set up the dynamic module and ioredis stuff which will be required for the client (ioredis) exposed from this module.
RedisThis is the major component of ioredis. Use it to connect to a standalone Redis server or Sentinels.RedisOptionsinterface in the ioredis library allows developers to configure the connection to a Redis server. It provides options for specifying the host, port, connection settings, authentication, TLS/SSL, database selection, connection pooling, and Redis Sentinel configuration. Using RedisOptions, developers can customize the connection behaviour to optimize performance, security, and reliability when working with Redis servers.
type RedisModuleOptions = {
  connectionOptions: RedisOptions;
  onClientReady?: (client: Redis) => void;
};
connectionOptions: This property of typeRedisOptionsspecifies the configuration options for connecting to the Redis server. It includes details such as the host, port, authentication, TLS/SSL settings, and more.onClientReady(optional): This property is a callback function that gets executed when the Redis client is successfully connected and ready to use. It takes a parameterclientof typeRedis, which represents the connected Redis client. Developers can use this callback to perform any necessary operations or initialization logic upon a successful Redis connection.
In summary, the RedisModuleOptions type allows developers to specify the connection configuration for Redis in a Nestjs application and provides a callback function to execute when the Redis client is ready. It provides flexibility and customization options for working with Redis in Nestjs.
type RedisModuleAsyncOptions = {
  useFactory: (
    ...args: any[]
  ) => Promise<RedisModuleOptions> | RedisModuleOptions;
  inject?: any[];
  imports?: any[];
};
useFactory: This property is a function that returns aPromise<RedisModuleOptions>orRedisModuleOptions. It is responsible for creating and returning the Redis module options. TheuseFactoryfunction can accept any number of arguments represented by...args: any[]. These arguments can be injected dependencies or other values required for creating the Redis module options.inject(optional): This property is an array of dependencies that should be injected into theuseFactoryfunction. These dependencies can be other providers or services required for creating the Redis module options. The dependencies will be resolved by the Nestjs dependency injection system.imports(optional): This property is an array of modules that should be imported by the Nestjs application. It allows specifying additional modules that are required for creating the Redis module options. These modules can provide the necessary providers or configurations used by the Redis module.
In summary, the RedisModuleAsyncOptions type is used for defining asynchronous configuration options for a RedisModule in a Nestjs application. It allows the use of a factory function to dynamically create the Redis module options, with support for dependency injection and importing necessary modules. This enables a more flexible and dynamic configuration of the Redis module in Nestjs.
@Module({})
export class RedisModule {
  static async registerAsync({
    useFactory,
    inject,
    imports,
  }: RedisModuleAsyncOptions): Promise<DynamicModule> {
    // we will look at the inner code later
    // first lets see what this module is doing
  }
}
The
registerAsyncmethod accepts an object of the typeRedisModuleAsyncOptionsas a parameter. This object contains the configuration options for the RedisModule, includinguseFactory,inject, andimports.Inside the
registerAsyncmethod, there is a block commented as "// code here". This is where the actual implementation code for registering the RedisModule asynchronously would go. It is where you would typically create and configure the necessary providers, set up the Redis connection, and define any other required functionality.The
registerAsyncmethod returns aPromise<DynamicModule>. This indicates that the registration process for the RedisModule is asynchronous and may involve async operations. TheDynamicModuletype represents a dynamically configured module in Nestjs.
Overall, this code snippet demonstrates the basic structure of a RedisModule in Nestjs and the registerAsync method for registering it asynchronously. The implementation code inside the method would handle the actual configuration and setup of the RedisModule in the Nestjs application.
// Implementation of the registerAsync function
static async registerAsync({
    useFactory,
    inject,
    imports,
  }: RedisModuleAsyncOptions): Promise<DynamicModule> {
    const redisProvider = {
      provide: IORedisKey,
      useFactory: async (...args: any[]) => {
        const { connectionOptions, onClientReady } = await useFactory(...args);
        const client = new IORedis(connectionOptions);
        if (onClientReady) {
          onClientReady(client);
        }
        return client;
      },
      inject,
    };
    return {
      module: RedisModule,
      imports,
      providers: [redisProvider],
      exports: [redisProvider],
    };
  }
implementation of the registerAsync method within the RedisModule class. Here's an explanation of the code:
The
registerAsyncmethod receives theRedisModuleAsyncOptionsobject as a parameter, containing theuseFactory,inject, andimportsproperties.Inside the method, a
redisProviderobject is created. It is a provider configuration object that will be responsible for creating the Redis client instance.The
redisProviderobject has the following properties:provide: It specifies the token (IORedisKey) that will be used to identify this provider. Use this for dependency injection later.useFactory: This is an asynchronous factory function that creates and configures the Redis client. It receives the arguments passed touseFactoryand asynchronously invokes it. It creates an instance ofIORediswith the providedconnectionOptionsand calls theonClientReadycallback if it exists. The Redis client instance is then returned.inject: It specifies the dependencies that should be injected into theuseFactoryfunction.
The method then returns a
DynamicModuleobject that represents the dynamically configured module. It has the following properties:module: It specifies the module class (RedisModule).imports: It lists the modules specified in theimportsproperty.providers: It includes theredisProvideras a provider.exports: It specifies that theredisProvidershould be exported, making it available for other modules that import theRedisModule.
In summary, the updated code creates a provider for the Redis client using the specified useFactory and inject properties. It configures the Redis client instance with the provided connectionOptions and onClientReady callback. Finally, it returns a DynamicModule object with the necessary configuration for the Redis module in Nestjs.
This is a complete code for the dynamic module, read through it to understand each piece and then move to the next part where we will set up a small docker script to run Redis and redis-insight and then connect to this server through our NestJS application using the RedisModule.
Step 3: Configure the RedisModule in our AppModule
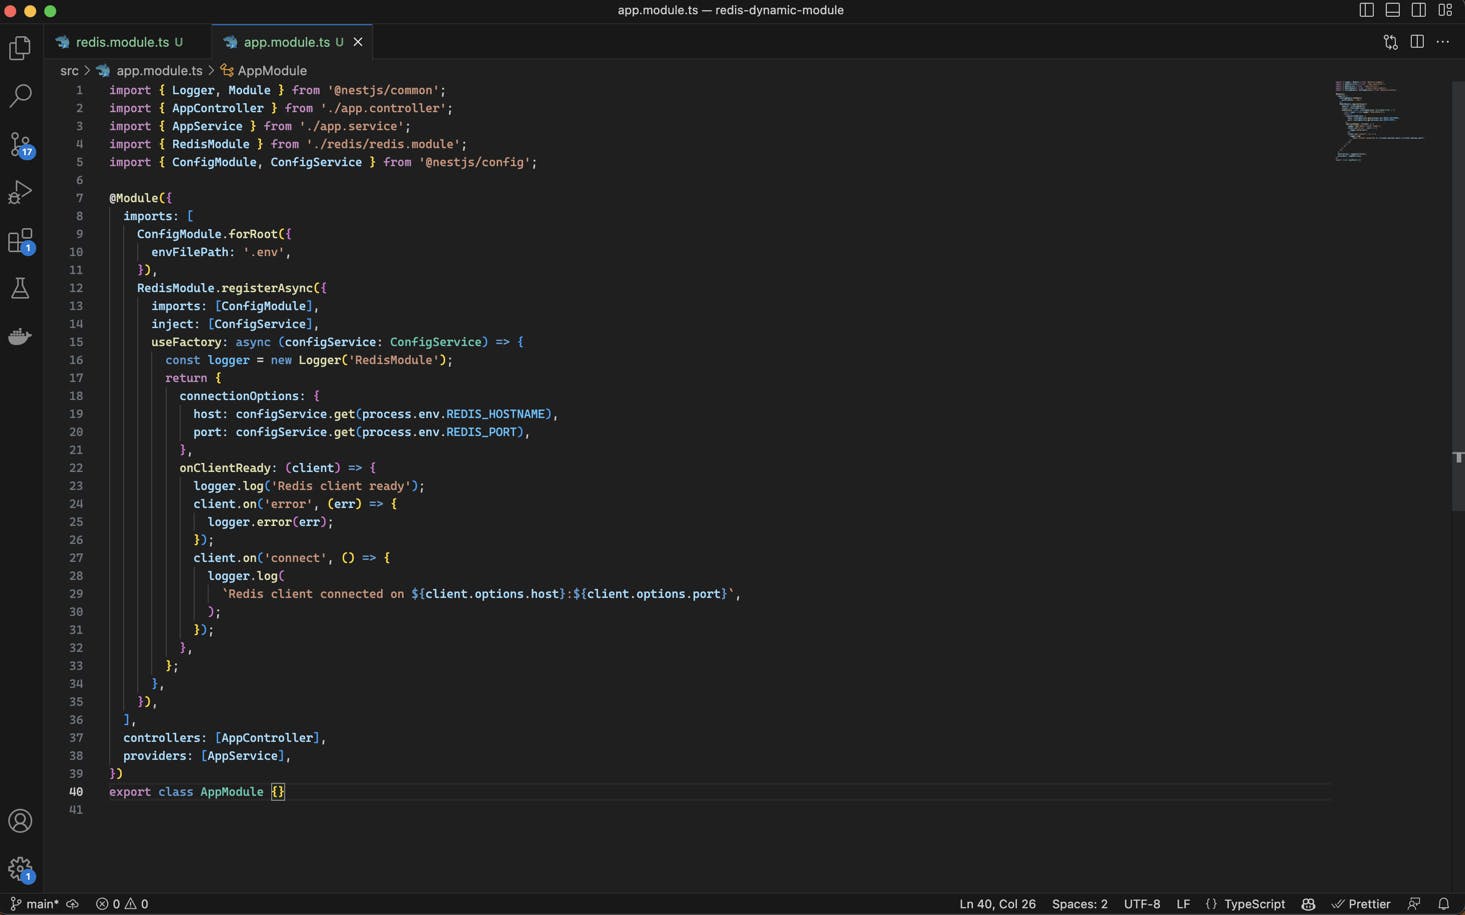
This code snippet represents the root module (
AppModule) of a Nestjs application. Here's an explanation of the code:The required modules and components are imported using the
importstatements. These includeLogger,Module,AppController,AppService,RedisModule,ConfigModule, andConfigService.The
@Module()decorator is used to define theAppModuleclass as a module in Nestjs.Inside the
@Module()decorator, theimportsarray specifies the modules that this module depends on. In this case:ConfigModule.forRoot()is used to configure the application's configuration module. TheenvFilePathoption specifies the path to the.envfile that contains the environment-specific configuration.RedisModule.registerAsync()is used to register theRedisModuleasynchronously. It provides the configuration for the Redis module using theuseFactoryfunction, which retrieves the Redis host and port from theConfigServiceinjected as a dependency.
The
controllersarray lists the controllers that are part of theAppModule. Here, it includes theAppController.The
providersarray specifies the providers (services) used within theAppModule. Here, it includes theAppService.
In summary, this code snippet defines the AppModule is the root module of the Nestjs application. It imports necessary modules, and configures the application's environment using ConfigModule, registers the RedisModule asynchronously with dynamic configuration, and lists the controllers and providers within the module.
(Bonus) Part 4: Docker to start Redis & Redis-insight services
Create a
docker-compose.ymlin the root of the projectUse
docker-compose upto start the container and servicesSet
REDIS_HOSTNAME=redisandREDIS_PORT=6379in the.envfile of the project
version: '3'

services:
  redis:
    image: redis
    restart: always
    volumes:
      - redis-data:/data
    ports:
      - 6379:6379
    networks:
      - redis-network

  redis-insight:
    image: redislabs/redisinsight:latest
    restart: always
    ports:
      - 8001:8001
    environment:
      - REDIS_URI=redis://redis:6379
    networks:
      - redis-network

volumes:
  redis-data:

networks:
  redis-network:
- On the success of the docker container, we see this
Part 5: Connect to the Redis server from the Nest application and set a key-value
Let's run our nest application and with all this setup we should be able to connect to this Redis server instance running in our docker container.
Run
npm run start:devin our project to start the nest app in dev mode.
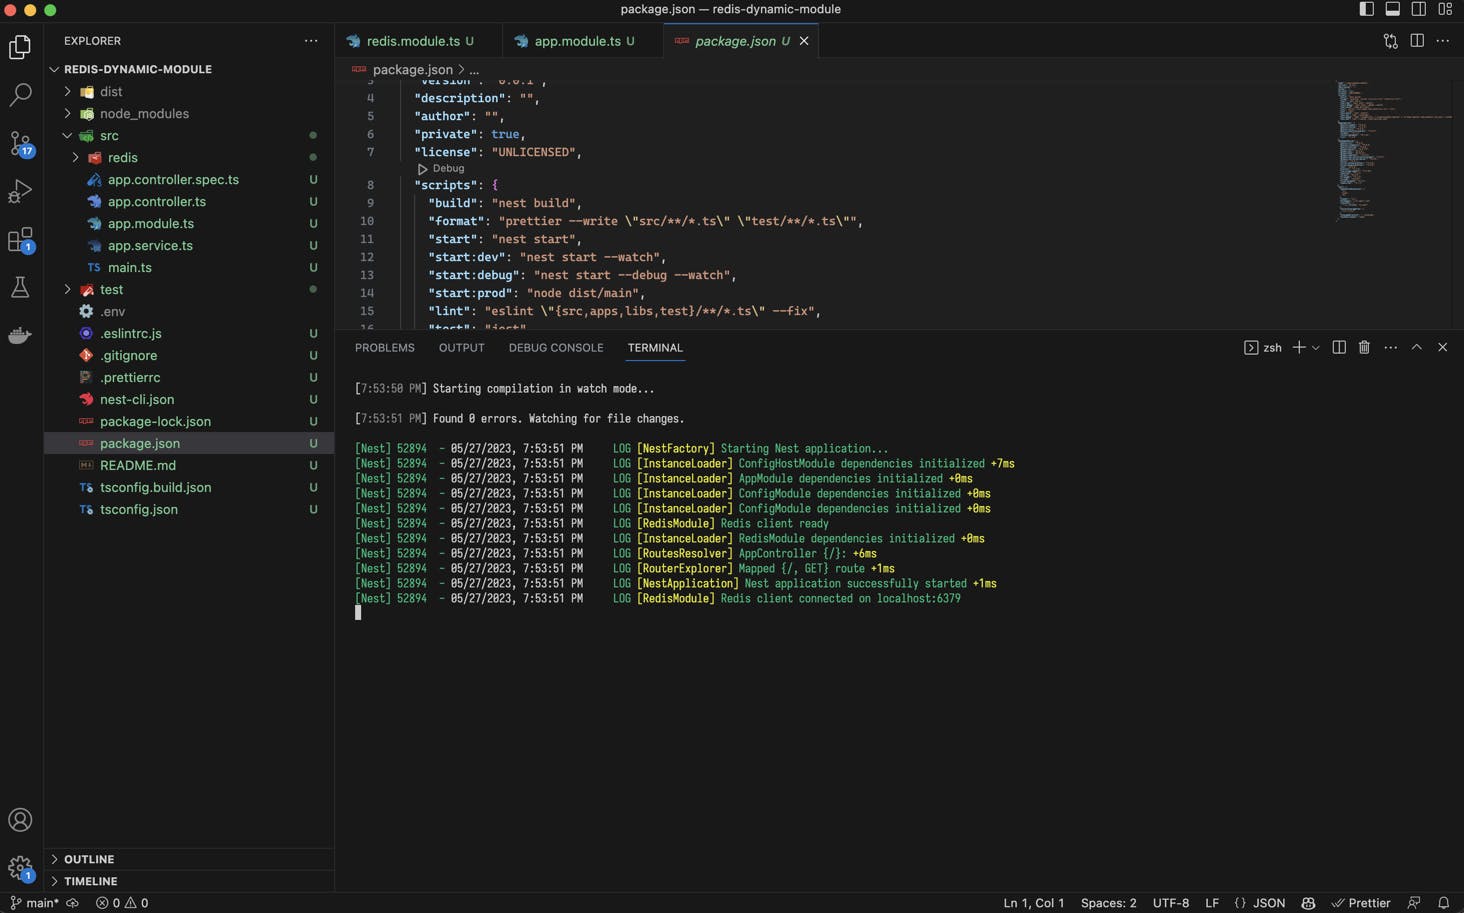
Success! RedisModule has connected to our Redis server, so our Nest application has access to the server and we can do actions through our exposed redisClient from this RedisModule, let's try setting a
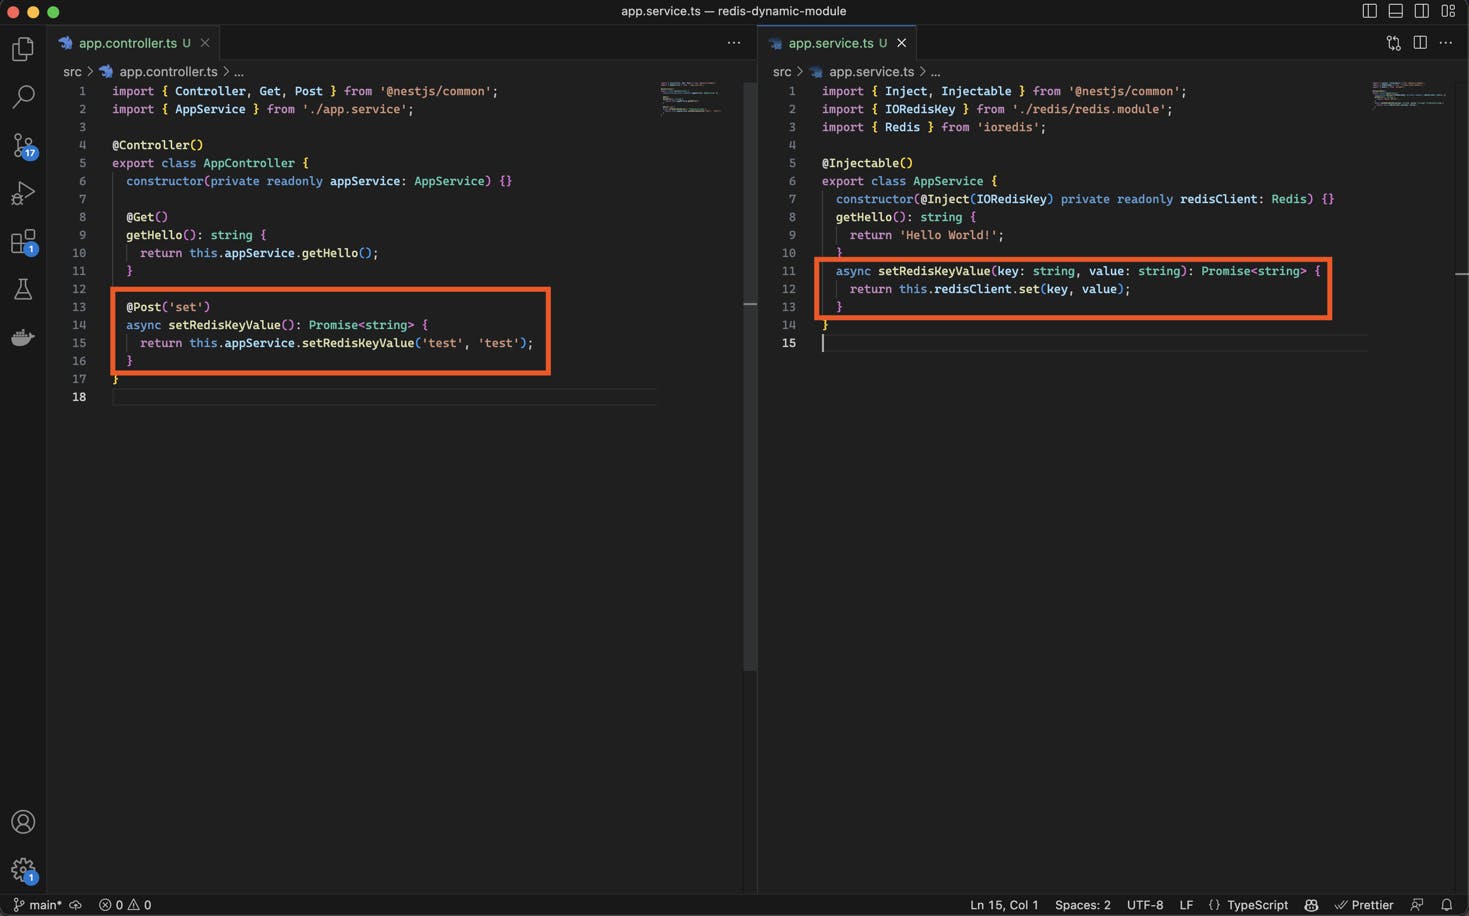
key-value.Let's modify the code in
app.controller.tsandapp.service.tsto create an endpoint to/POST('set')and also a service functionasync setRedisKeyValueto interact with the Redis server and send back a response on success.
Let's test this endpoint from the terminal using
curlor use any client of your choice and see the logs in our Nest application.To send a post request to our endpoint
http://localhost:3000/setcurl -X POST http://localhost:3000/set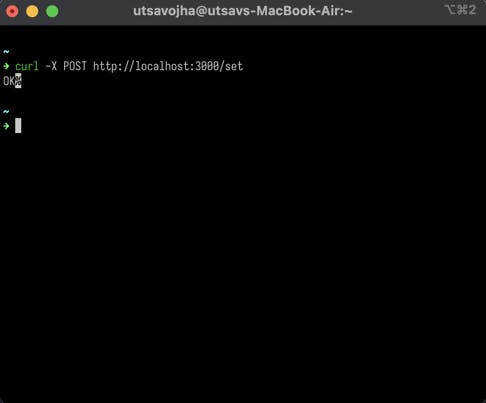
Aha! Success! This response from our Redis server uses the redisClient to set the key value to our kv (key-value) store.
Let's make sure it's set by looking at our Redis server using the Redis-insight service. Open the browser, navigate to
http://localhost:8001and get access to the dashboard.Redis-insight (server gui) also gives us the same information, the key value is set.
Conclusion
There! We did it! The RedisModule is dynamic and we can configure it asynchronously where ever it's required and get access to a redisClient it exposes to interact with our Redis server.